C++/CLI 환경에서 Windows Forms(GUI)를 사용하여 화면 녹화 프로그램을 만드는 방법을 프로젝트 생성부터 코드 구현까지 처음부터 자세하게 설명해 드리겠습니다.
Visual Studio 최신 버전(2022 및 2026 포함)에서는 C++/CLI 기반의 Windows Forms 디자이너를 공식적으로 더 이상 기본 템플릿으로 제공하지 않습니다. 따라서 CLR 빈 프로젝트를 만든 후, Windows Forms 컴포넌트를 수동으로 추가하여 디자이너를 활성화해야 합니다.
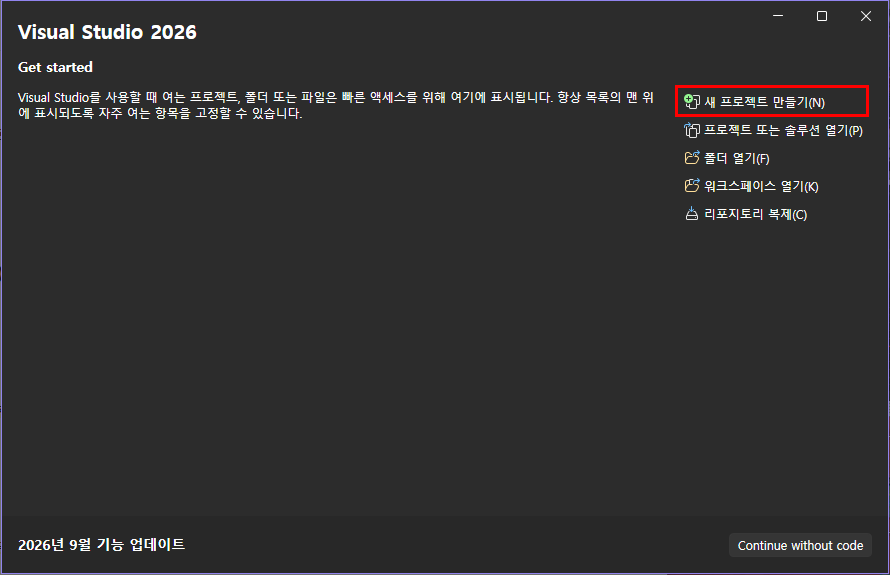
Visual Studio를 실행하고 새 프로젝트 만들기를 선택합니다.
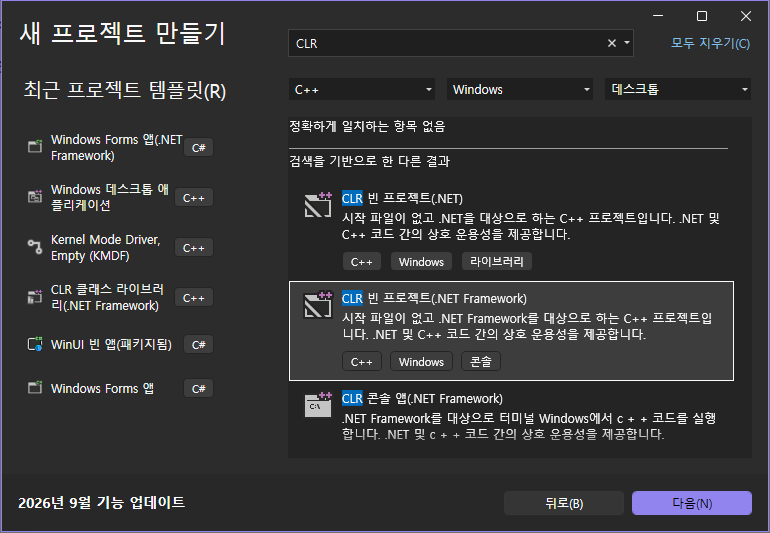
우측 상단 필터에서 언어를 C++, 플랫폼을 Windows로 설정합니다.
검색창에 CLR을 입력하고, CLR 빈 프로젝트(.NET Framework)를 선택한 후 [다음]을 누릅니다.
※ 'CLR 콘솔'이나 '.NET Core/NET 6+'가 아닌, .NET Framework용 빈 프로젝트를 골라야 GUI 디자이너 연동이 쉽습니다.
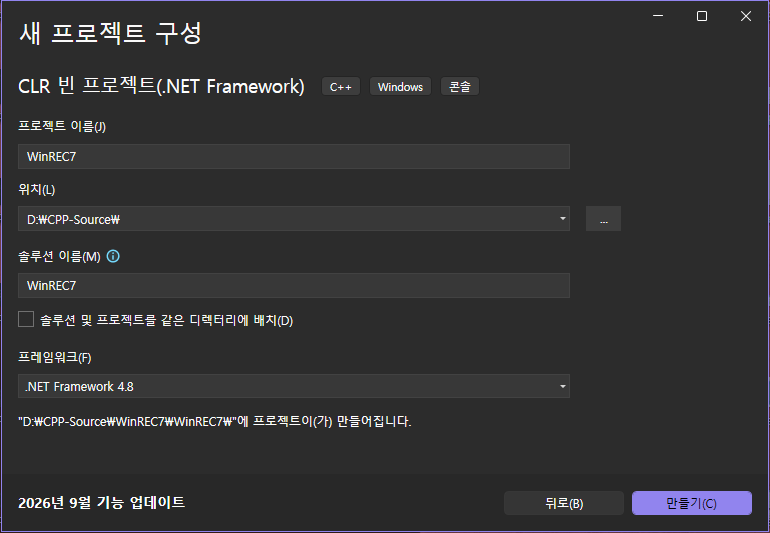
프로젝트 이름(예: WinREC7)을 입력하고 [만들기]를 클릭합니다.
상단 툴바에서 빌드 플랫폼 드롭다운을 열어 Any CPU로 되어 있는 것을 x86 이나 x64로 변경합니다.

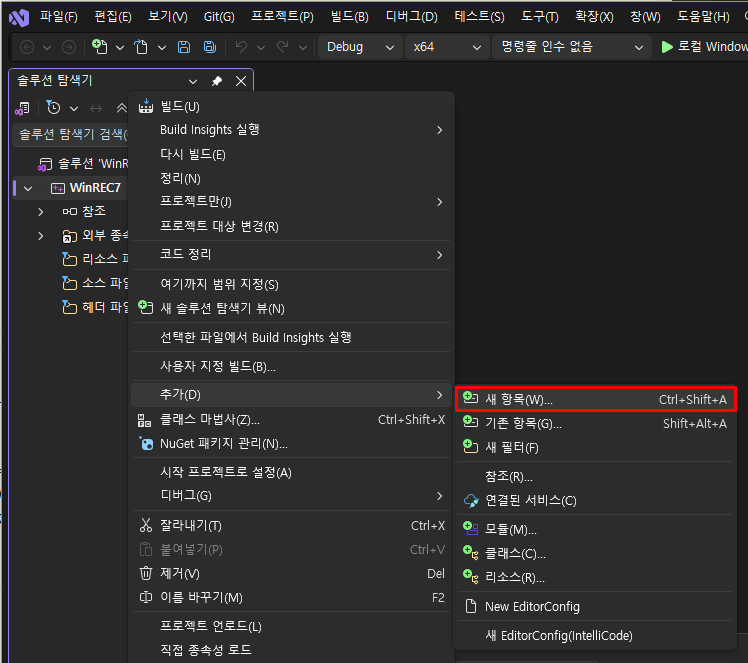
솔루션 탐색기에서 프로젝트 이름을 마우스 우클릭 -> 추가(D) -> 새 항목(W)...을 선택합니다.
좌측 카테고리에서 UI를 선택하면 나오는 Windows Form 템플릿을 선택합니다.
파일 이름(기본값: MyForm.h)을 확인하고 추가(A)를 누릅니다.
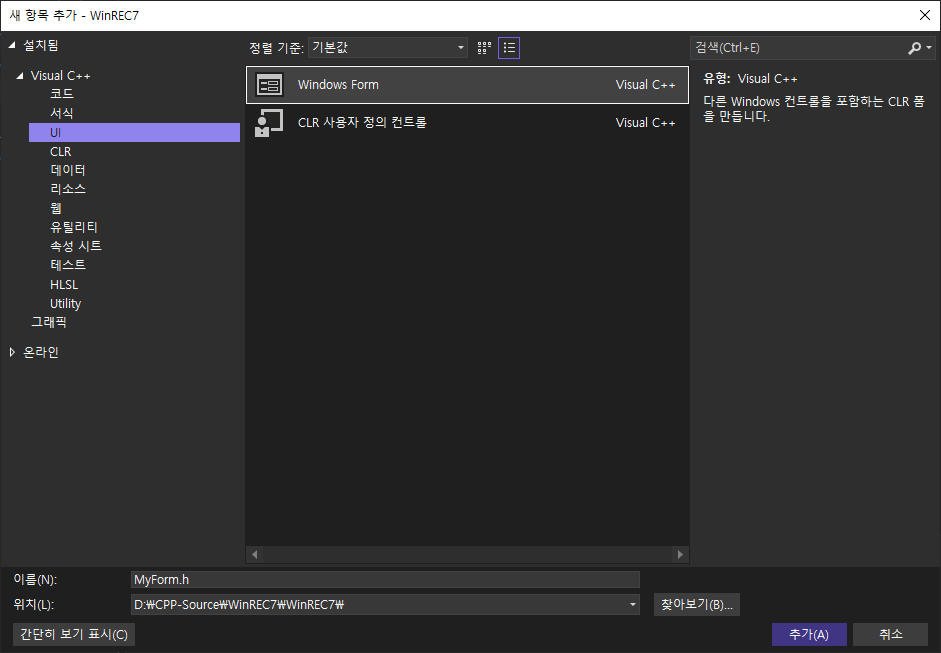
Visual Studio 2026 에서는 정상적으로 표시가 됩니다.
이전 버전의 Visual Studio 에서는 처음 Form을 추가하면 디자이너 뷰에 "작업을 완료할 수 없습니다"라는 오류가 뜰 수 있습니다. 이는 C++ 컴파일러가 아직 코드를 파싱하지 못해서 발생하는 현상이므로, Visual Studio를 완전히 닫았다가 다시 프로젝트를 열면 정상적으로 GUI 디자인 창이 나타납니다.
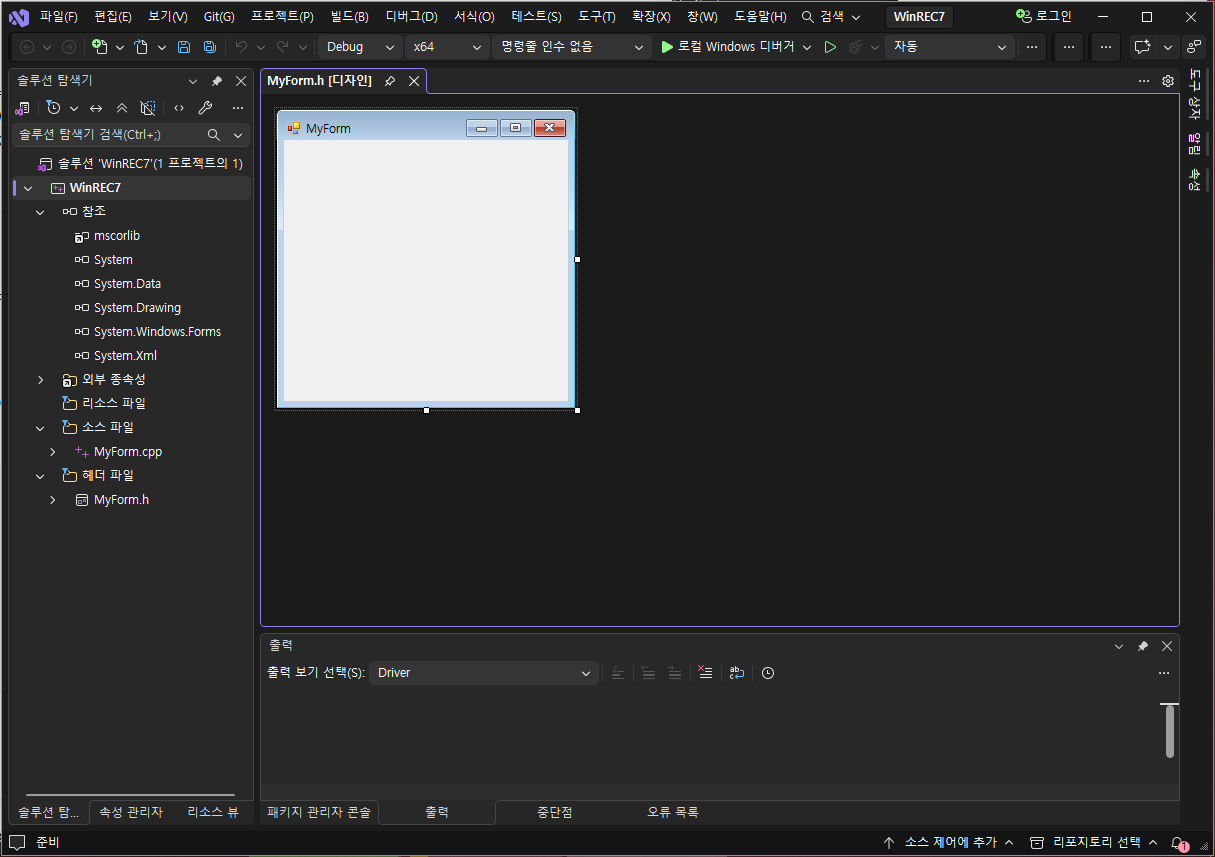
순수 빈 프로젝트에서 시작했기 때문에, 이 프로그램이 콘솔창 없이 GUI 창으로 바로 켜지도록 진입점을 지정해 주어야 합니다.
솔루션 탐색기에서 생성된 MyForm.cpp 파일을 열고 기존 코드를 모두 지운 뒤, 아래의 메인 진입점 코드를 그대로 복사하여 붙여넣습니다
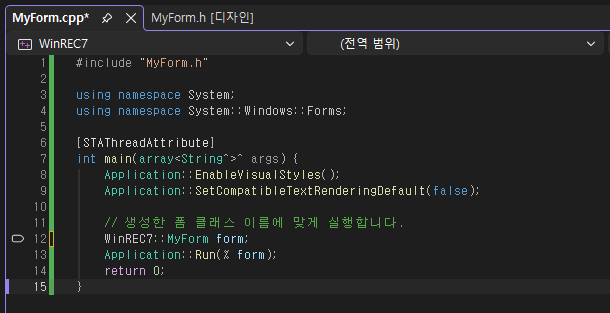
#include "MyForm.h"

using namespace System;
using namespace System::Windows::Forms;

[STAThreadAttribute]
int main(array<String^>^ args) {
    Application::EnableVisualStyles();
    Application::SetCompatibleTextRenderingDefault(false);

    // 생성한 폼 클래스 이름에 맞게 실행합니다.
    WinREC7::MyForm form;
    Application::Run(% form);
    return 0;
}
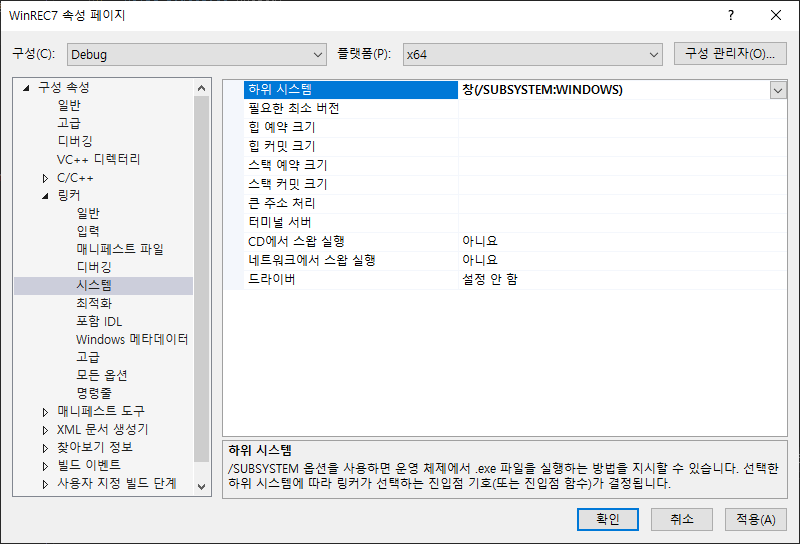
솔루션 탐색기에서 프로젝트 우클릭 -> 속성(Properties)으로 들어갑니다.
구성 속성 -> 링커(Linker) -> 시스템(System)으로 이동합니다.
하위 시스템(SubSystem) 항목을 창(/SUBSYSTEM:WINDOWS)으로 변경합니다
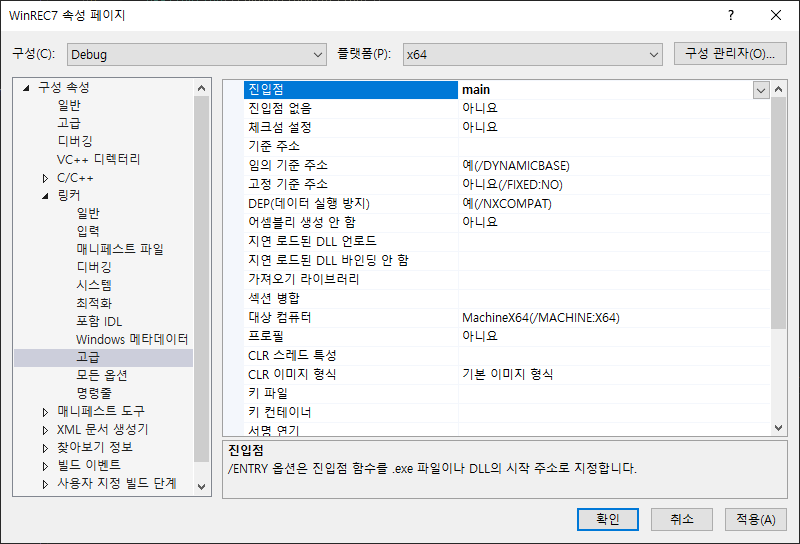
구성 속성 -> 링커(Linker) -> 고급(Advanced)으로 이동합니다.
진입점(Entry Point) 항목에 main을 입력합니다.
[확인]을 눌러 저장합니다.
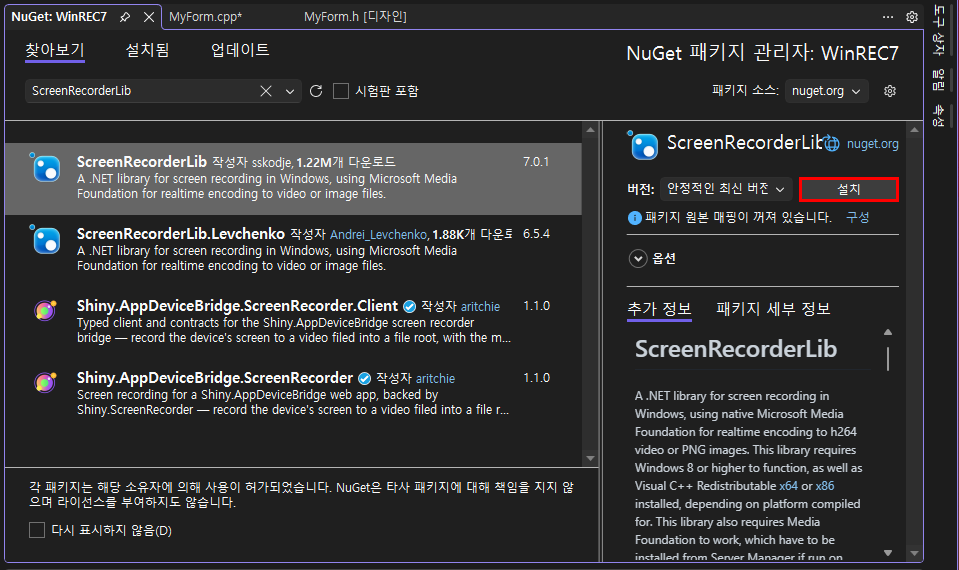
솔루션 탐색기에서 프로젝트 WinREC7 우클릭 -> NuGet 패키지 관리(Manage NuGet Packages...)를 선택합니다.

찾아보기(Browse) 탭에서 ScreenRecorderLib를 검색합니다. 패키지를 선택하고 설치를 진행합니다.
설치가 끝나면 아래 그림처럼 나옵니다.
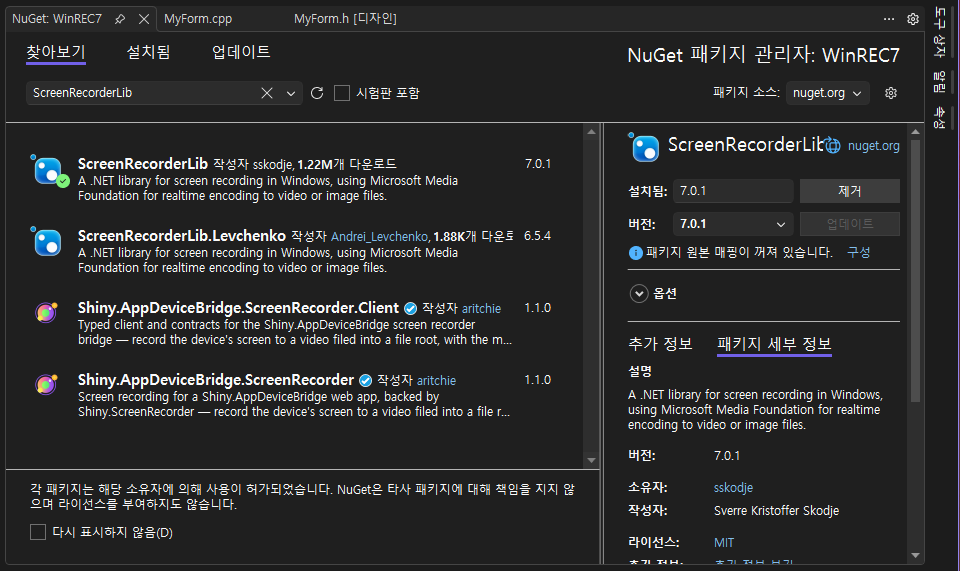
NuGet 패키지 설치가 끝났으므로 탭을 닫고, MyForm.h를 더블클릭하여 디자이너 뷰를 엽니다.
도구 상자(Toolbox)에서 버튼을 드래그하여 두 개 배치합니다.
1. 첫 번째 버튼: 속성 창에서 (Name)을 btnStart, Text를 녹화 시작으로 변경
2. 두 번째 버튼: 속성 창에서 (Name)을 btnStop, Text를 녹화 중지로 변경
디자이너 뷰에서 [녹화 시작] 버튼을 더블클릭하면 자동으로 MyForm.h 코드 내부에 클릭 이벤트 함수가 생성됩니다. [녹화 중지] 버튼도 동일하게 더블클릭하여 이벤트를 생성합니다.
#pragma once

// ScreenRecorderLib 네임스페이스 추가
using namespace ScreenRecorderLib;
using namespace System::IO;

namespace WinREC7 {

	using namespace System;
	using namespace System::ComponentModel;
	using namespace System::Collections;
	using namespace System::Windows::Forms;
	using namespace System::Data;
	using namespace System::Drawing;

	/// <summary>
	/// MyForm에 대한 요약입니다.
	/// </summary>
	public ref class MyForm : public System::Windows::Forms::Form
	{
	private:
		// 라이브러리의 Recorder 객체를 멤버 변수로 선언합니다.
		Recorder^ _recorder;

	public:
		MyForm(void)
		{
			InitializeComponent();

			// Form이 켜질 때 Recorder 객체를 초기화합니다.
			_recorder = Recorder::CreateRecorder();
		}

	protected:
		/// <summary>
		/// 사용 중인 모든 리소스를 정리합니다.
		/// </summary>
		~MyForm()
		{
			if (components)
			{
				delete components;
			}
		}
	private: System::Windows::Forms::Button^ btnStart;
	private: System::Windows::Forms::Button^ btnStop;
	protected:


	protected:

	private:
		/// <summary>
		/// 필수 디자이너 변수입니다.
		/// </summary>
		System::ComponentModel::Container ^components;

#pragma region Windows Form Designer generated code
		/// <summary>
		/// 디자이너 지원에 필요한 메서드입니다.
		/// 이 메서드의 내용을 코드 편집기로 수정하지 마세요.
		/// </summary>
		void InitializeComponent(void)
		{
			this->btnStart = (gcnew System::Windows::Forms::Button());
			this->btnStop = (gcnew System::Windows::Forms::Button());
			this->SuspendLayout();
			//
			// btnStart
			//
			this->btnStart->Location = System::Drawing::Point(90, 60);
			this->btnStart->Name = L"btnStart";
			this->btnStart->Size = System::Drawing::Size(102, 45);
			this->btnStart->TabIndex = 0;
			this->btnStart->Text = L"녹화 시작";
			this->btnStart->UseVisualStyleBackColor = true;
			this->btnStart->Click += gcnew System::EventHandler(this, &MyForm::btnStart_Click);
			//
			// btnStop
			//
			this->btnStop->Location = System::Drawing::Point(90, 137);
			this->btnStop->Name = L"btnStop";
			this->btnStop->Size = System::Drawing::Size(102, 45);
			this->btnStop->TabIndex = 1;
			this->btnStop->Text = L"녹화 중지";
			this->btnStop->UseVisualStyleBackColor = true;
			this->btnStop->Click += gcnew System::EventHandler(this, &MyForm::btnStop_Click);
			//
			// MyForm
			//
			this->AutoScaleDimensions = System::Drawing::SizeF(7, 12);
			this->AutoScaleMode = System::Windows::Forms::AutoScaleMode::Font;
			this->ClientSize = System::Drawing::Size(284, 261);
			this->Controls->Add(this->btnStop);
			this->Controls->Add(this->btnStart);
			this->Name = L"MyForm";
			this->Text = L"MyForm";
			this->ResumeLayout(false);

		}
#pragma endregion
	private: System::Void btnStart_Click(System::Object^ sender, System::EventArgs^ e) {
		// 바탕화면에 test_gui.mp4 파일로 저장하도록 설정
		String^ desktopPath = Environment::GetFolderPath(Environment::SpecialFolder::Desktop);
		String^ videoPath = Path::Combine(desktopPath, L"test_gui.mp4");

		try {
			// 녹화 시작
			_recorder->Record(videoPath);
			btnStart->Enabled = false;
			btnStop->Enabled = true;
			MessageBox::Show(L"녹화가 시작되었습니다.");
		}
		catch (Exception^ ex) {
			MessageBox::Show(L"오류 발생: " + ex->Message);
		}
	}
	private: System::Void btnStop_Click(System::Object^ sender, System::EventArgs^ e) {
		try {
			// 녹화 중지
			_recorder->Stop();
			btnStart->Enabled = true;
			btnStop->Enabled = false;
			MessageBox::Show(L"녹화가 완료되어 바탕화면에 저장되었습니다.");
		}
		catch (Exception^ ex) {
			MessageBox::Show(L"오류 발생: " + ex->Message);
		}
	}
	};
}
이제 F5 키를 눌러 빌드 및 실행하면 완성된 윈도우 창이 나타납니다. 녹화 시작을 누르면 바탕화면 녹화가 진행되고, 녹화 중지를 누르면 정상적으로 파일 저장을 마칩니다.
최종 생성된 test_gui.mp4 파일은 바탕화면에 저장됩니다.